This Example of Fiber Art Is a Woven Wall Hanging Cloth Art 101
I've just taken part in my first show after two years of Covid restrictions and it felt cracking to exist back to normal! The event was the British Quilt & Sew Hamlet, an almanac 3 day textile show held at Uttoxeter Racecourse in Staffordshire.

It was my first time exhibiting at Uttoxeter and I wasn't sure what to expect. Would visitor numbers be depression? Virtually ladies attending shows like this are of a sure age (me included!) and I know some notwithstanding have concerns about mixing in large groups. This is predominantly a quilt prove, would at that place be plenty interest in feltmaking or would the majority walk direct passed? I was manning my stall lone…. would the neighbouring stall holders be too busy to relieve me when I needed a loo break? I needn't have worried, when the doors opened at 10am the visitors flooded in and it turned out to be three very "full on" days! These are a few of the items I had on show……


My pitch was next to Projection Linus, a charitable organisation that provides quilts and blankets for children in need. Their aims are to "Provide dear, a sense of security, warmth and comfort to children who are seriously ill, traumatized, or otherwise in demand through the gifts of new handmade blankets and afghans, lovingly created past volunteer "blanketeers." And to "provide a rewarding and fun service opportunity for interested individuals and groups in local communities, for the benefit of children."
Project Linus always attracts a lot of interest and the two lovely ladies on that stand were swamped with visitors for the three days! Somehow they still managed to cover for me when I needed a comfort break which was really appreciated!

I didn't get much risk to visit other stands but when Jane (Wylde Oak Artistry) came over to say hello and told me she was working with Spun-bond fabrics I had to go run into her work. I loved her masks and corsets, made on the theme of body dysmorphia, and came away feeling that at that place is and so much more I could be doing with Lutradur!

Another stand I particularly enjoyed was "Traverse", a group of exhibiting cloth and mixed media artists. Apologies for not getting close ups of their piece of work…….it'due south worth following the link and taking a look at their website.

Information technology's a bully bear witness, spread over three large halls as well as various other smaller buildings. Most of the photos I took were prior to opening just as you will see from the last three, we really did become visitors! Gyre on Quilt & Stitch Village 2023!


This calendar week, I am back to working on felted flowers betwixt Library work. I have the last bit of data I needed for my year-stop report (then I had better take a moment to fill that in and transport it off to the social club executive). Now that is washed I can get back to Felting.
A few weeks agone, I watched a workshop given by Tjarda van der Dussen. She made rose petals that were wonderfully thin. Side by side, she used a tiny craft fe to flatten them farther. Then finally, she assembled them, adding leaves to the stems, into a life-like Rose.
I made a prototype of iris petals (https://feltingandfiberstudio.com/2022/04/14/inspired-to-felt-an-iris-paradigm/) but did non yet have a tiny iron to try that role of her instructions. The epitome iris proved that the pattern I had constitute online made a reasonably accurate disguised iris. I gave it a ZZ top bristles, not a respectable Gotee simply I was having fun and it was a paradigm.
 ane Epitome iris testing the pattern
I am very fond of irises, I think they may be my favourite flowers. (if only they flowered longer!) I accept had different colours, only most are of the large disguised variety. The frilly peach one in the backyard, came with us from the townhouse we rented before I bot this piddling firm. (My business firm is a semidetached bungalow, so I gauge technically it is just one-half a house.) The location was skilful, and the thousand was about twice as big as a townhouse with more room for plants, so I bought information technology. The house came with a dieing red maple tree, which I could put my hands effectually. The first spring I added a garden to the front end thou with the unhappy tree. Unfortunately when I watered the front garden the mostly expressionless red maple grew and over the adjacent few years became a heavy shade-producing tree, thus all the lord's day-loving plants I had planted were non impressed. My dorsum yard volition likely take the aforementioned fate since in that location is now a rapidly growing red maple in the one thousand behind me, which volition eventually shade a lot of my 1000 also. (Don't tell my plants!!)
So let'due south expect at a few Iris from my garden over the years. I hope they will inspire you too.
 ii Bronz and White iris
The bronze Iris is quite hardy but is non as flashy as some of the dejection, or as delicate as the frill-edged peach. The white is besides quite delicate in looks and does not flower every year.

 iii-iv Frill-edged Peach Iris
The frill-edge Peach is particularly showy but has been known to face up plant since the flower is large and the stem is long. I have to think to necktie it upwards before it falls over this yr.
 5 I have two of the smaller varieties of iris, this smaller diversity, and an early dwarf spring clump that is an fifty-fifty darker blueish dark.
I have had several iris in the front yard that accept slowly died back and disappeared as both my tree and the neighbour'south Linden tree continued to grow and make shade. Some accept been quite spectacular and I am deplorable they did non terminal.
 vi Fancy Iris
My lawn iris take fared better but were threatened with shade from an over-enthusiastic grapevine last year. (At that place will be a word of boundaries involving sheers before long with said vine.)
 7 backyard iris
I accept even grown some, through the summer, in pots to good outcome.
 8 Iris in pots
On to the next (felt) iris.
I tried Earth of Wool core wool with the bit of kemp on the first petal. Laying out the general shape then adding a scrap of the mixed blue merino braid I had used before for edging colour.
 ix laying out the fibre
 10 calculation the blue edging
I used the T-36 to tack it in the full general expanse, leaving some hanging off the edge of the petal to add to the underside when I flipped the petal. I switched to the false clover tool to imbed the blue fibre into the white. I realized I had forgotten to add together the wire to pose the petal and then added it now then back to poking. I flipped frequently and found that if I worked a chip deeper I would transfer some of the blues to the other side giving a improve mottle.
I worked one side and then the other side until the petal was the right shape but non as thin as I wanted.
 11 switching to the simulated clover tool
I left the first petal at this point and started a 2nd, this time using a small batt I had purchased from Wabi Sabi in Ottawa. Information technology was a Rambouillet/ Merino mix batt, that had a nice crimp merely was not quite equally lustrous as the core wool.
 12 Batt of Merino- Rambouillet
I did the same layout of fibre poking at a low bending forth the edge of the pattern piece to go the shape required.
 13 when I had the fibre belongings together (not good felt merely it was not falling apart) I added the wire.
 14 calculation wire through the heart
After making more than petals I may role the tip finish too as make a long role back just so information technology won't poke upwardly into the flower petal. Once more, I added the bluish to the edge and wrapped information technology over the border of the petal, taking downward the fibres with the 36T and then using the simulated clover tool with the 40t's.
 15 adding the blue edging
Comparison the 2 petals, I decided to go along with the pocket-sized batt of Rambouillet /merino.
 16 comparing the ii types of wool in the petals
 17 I suspect that this type of foam mat may be demoted back to a garden kneeling pad.
A couple of days earlier Ann had spotted another wool felting mat on Amazon. Information technology was white and similar in size to the greyness one I purchased and reviewed recently. This one was described equally; "KEO ST. Needle Felting Pad – 100% New Zealand Wool Mat for Precision Felting. Natural Cream Color, 10" x 8" x 1" – Complete with 2 Handmade Leather Finger Guards". (that was a mouthful lets just phone call it the white wool mat.
I also ordered a "fourteen″x14″ Wool Pressing Mat for Quilting" and so I would be ready to apply the "Clover Mini Fe 2-The Adapter Fix" which I had ordered when it went on sale earlier. (Information technology's support to an exorbitant price again.)
 18 the new white felting pad (it came with more than finger cots!)
 19 permit's try it out
So let's try this one out. Information technology is much firmer felt than the grayness wool with kemp felting mat. It is still softer to work into than the firm red foam. It does not leave lilliputian bits of red foam in the felt. Unlike the softer grey wool with kemp mat, it had no aroma. Both seem to be made in layers that are commercially needle felted together. The needle end-feel on the white is firmer than the grey but nevertheless less than the red kneeling foam. I did find I had some fibre transfer but I was trying to movement the blue colour from one side of the petal to the other. The fibre transfer to the mat would have been less if I had not wanted to work so deeply. (a opposite needle would have been able to pull fibre from one side to the other as well.)
I have recently seen the use of a thinner slice of house felt placed over a mat to protect the mat from getting fibre transfer. Sort of like putting a mattress topper on top of a mattress to get in more comfy and longer waring. (not the type of mattress that has a built-in top since yous deceit flip them only rotate them they tend non to concluding every bit long every bit the un-pillow-toped mattresses. Deplorable got distracted. Back to felt!) I may try to rails downwards a calorie-free and a dark piece of firmer felt about a ¼ inch thick to try every bit a cover for my felt pads. I could see it extending the life of the mat, whether or not information technology works to go along fibre colour transfer from your work.
As long as you are lifting frequently and flipping the petal I found both the white (stiffer stop feel) and the Grayness (softer end feel) wool pads comfortable to work on. They would be comfortable to work a picture on (again lifting frequently) or to use as a working surface for a sculpture.
I worked on the larger lower petals and and then worked on the smaller upper petals.
 xx-21 using the needle at a low angle and moving the tinning fibre towards the middle of the petal
My focus was to work every bit thin as I could while however creating a firm felt. I institute that working effectually the edge with the multi-tool tended to spread the shape while it thinned the felt. I would alternate multi-tool to flatten then switch to a single needle working more than horizontally towards the center to counter the spread. The pattern piece was helpful to check the size and get it dorsum into the correct shape.
The other technical detail to consider is about the wire inside the petal. I have quite a bit of feel felting with armatures. Very occasionally working needles through the wool and around wire I will restriction one. It is commonly when I start to endeavour to work besides quickly or I am distracted (trying to sentinel YouTube rather than mind to an audiobook). Working with such sparse felt defiantly requires more care and less speed. In the center of the petals where the wire is located, I found I had problems with the fake clover multi-tool and broken needles. I somewhen shifted to focusing the multi-tool to thin the edges and the single needles to work about the wire and reshape the petals. This improved the longevity of my needles.
I worked the petals in stages. First holding together enough to insert the wire, and then to the indicate information technology was the correct size and shape just not firm enough, then finally going back over each petal until it was the firmness I wanted and about the correct shape.
 22 comparing thinness
The petal on the right is the basic petal shape which has been worked long plenty to hold its shape. For the petal on the left, I have continued to work with both the multi-tool and the unmarried needle to the bespeak of existence quite a firm felt. If the felt was this dumbo but thicker (more of it) the light gauge of wire I am using would not be strong enough to hold a shape against the strength of the wool. I tried floral wire gauge 20 and an undesignated floral wire that I call up perhaps 24gauge. I continued working with the other petals until all seemed to be as sparse as I could get them.
Next week we volition look at the new equipment that has arrived so i can continue working on these petals.

I recently heard nearly a no water, no needle mode of making prefelt. I thought I would requite it a attempt and run across how information technology works. It'due south fairly simple. You layout your wool on a mat or plastic and curlicue it dry. When I teach resist felting I usually dry felt the layout by just pressing and wiggling to go far stick together well enough to pick upwards and move, so we can brand the second side. I am sure nosotros have all found that ball of roving in the lesser of a handbag that is well on its way to bing a solid felt blob. Taking this idea farther just makes sense.
On Sun it was Library day at the order and I knew it would be a fairly quiet one so I took my supplies with me. Here is my effort at dry out not-needled prefelt.
I am using a rubbery placemat and a plastic grocery bag. The Grocery bag is considering I put the petty piece of plastic in my coat pocket and and then didn't wear my glaze. I picked 2 colours so I can see how much migration there is if any. I did jiggle the felt to stick it together, the aforementioned mode I do when I want to move a layout.


I rolled it 100 rolls in each management flipping it betwixt as well. It came out very apartment and has started to shrink.


I rolled it some more. I had intended to do another 100 rolls in each direction but nosotros were chatting and then I am sure it got much more than that, especially on the last ready of rolls. It definitely shrunk in both directions merely non a lot.


I cutting it to see what it looked similar. the edges are thicker and flatter than the middle merely it's yet pretty solid.

Jan took a movie of it with her camera. It shows how sturdy the prefelt is.
I rolled information technology again to see how the edges would fair. There were wisps that migrated out in the direction of the rolling. I think information technology would take been meliorate to just finger rub the edges. There was really no migration to the surface by the opposite layer.

All in all, I call up it worked well with very little fuss. Next, I am going to effort cut out some shapes and felting them on their own, to prefelt and on a fresh layout. Have y'all ever tried this method? how did it get?

Recently, a local woman asked me to create a river view in felt for her. I created several watercolor sketches she could choose from then that nosotros agreed on what the landscape would wait similar and what to include. The client lives on the Swan River here in Montana and decided she wanted a view similar to what she has backside her domicile.

After paw carding and blending colors, I started on the layout. I used a commercial prefelt background and generally curt fiber merino batts. Somehow, I wasn't thinking correctly on shrinkage as I went with the thought that it would shrink 30%. Simply I forgot that I don't commonly full my wool paintings very hard as they don't really demand intense fulling.

I connected working down the flick laying out the distant trees, the river with the copse and mountains reflections and so into the foreground grass and lupines. At the same fourth dimension I was laying out the big piece, I as well laid out a smaller sample. That way I could try different options with terminal details and stitching. This shows the birch copse from silk paper that I was trying to decide upon. Luckily, I had fabricated the birch tree silk paper several months ago at i of our local group meetings.

Hither'south the minor sample that I fabricated. I tried the left tree trunk in prefelt and so used free motion machine stitching for the dark areas. The right tree torso used silk paper which was painted for the dark areas. I too tried out some FME for the branches and the lupines. I didn't feel that the FME was what I wanted for this piece and opted for the silk paper birch trunks. I had also used some brown/tan wool for the distant shoreline which was manner too much if included in the original moisture felting process. I ended up cutting out a portion of this sample then that the brown wool was showing much less. I and so stitched the ii pieces of the sample back together to give the experience of what I wanted in the big slice. This sample really saved me from making some big mistakes!

Here is what I had after wet felting. I had to total this piece very hard every bit the request was for a certain size. I don't normally worry about size on my wet felted landscapes and I ended up cutting the edges because I had not figured the shrinkage correctly.

Next I started adding in needle felt details. I added more definition to the afar tress, added a shoreline and added some lines in the water to simulate motility.

Then I stitched some grass in the foreground and stitched downward the silk paper tree trunks.


I continued on with details. I added some paint to the tree trunks, I couched downwardly branches and added leaf details with needle felting. I added mitt stitching in front of the trunks and some leaf details for the lupine.

Hither's a close up and so you can see a chip of the detail in the foreground.

Then I found I already had enough green fabric that worked to end the piece. My client is getting it framed with barn woods, so this is how I delivered the piece. And the wonderful thing is that she loved it. I'g so happy it worked out the manner that she wanted.

Jump means many things, but it ever reminds me of our Ottawa Valley Weavers' and Spinners' Lodge foray into growing our own flax, aka 'The Flax Projection'. Its hard to believe it was over ii years ago, nearly 3, that a group of u.s. tackled the happy adventure of trying to produce our own flax ingather, not once, merely twice. It brought back memories of warm spring days planting and weeding, hot, hot summer days of staking and weeding (the one constant was weeding), days of harvesting, drying, retting, seeding, rippling, scutching and all those lovely baroque words to describe specific processing of flax. Flax is grown and harvested in a customs, but it is customarily spun in the winter when there is no other more pressing work to do. I find it very dusty and messy fiber to spin, or perchance I only don't like doing that role without the shared company of swain fiber lunatics.
So while I was clearing out $.25 and pieces of unfinished projects, I found my share of the flax and tow.


I also found loads of other flax that had been spun over the years.
Virtually have been left as singles and is gear up for weaving.

Some I boiled equally an experiment. Flax will lighten in colour if you boil it. Information technology too softens significantly and your business firm volition smell like hay soup.

Some came to me bleached, and then I gave that a spin. It was extremely soft. My business organization is for the durability of anything made with prebleached flax fiber. Woven flax is renamed linen for those of you lot who didn't know, and linen fabric is incredibly strong, and long wearing.

In that location are two down sides to linen; ane is that it wrinkles. I like the wrinkles of linen, especially jackets and trousers, but some people can't stand that feature. The other is its tendency to fade. Linen will take colour simply over fourth dimension it will lose that color and move towards white. Again, I like this in linen, and it takes ages for this to happen. A vivid, bright bluish volition mute over years and acquire a vintage await that tin can simply be seen in linen.
Covid enabled me to join a almost remarkable grouping of flax enthusiast started by an extremely generous adult female in Europe. Her name is Christiane; she was gifted a big quantity of flax from a lady called Berta. This was from Berta'south dowry. Christiane decided to share information technology with other interested spinners and reached out on social media. I asked for two stricks. A strick is what the finished combed flax. It is commonly very fine, has little to no straw and is very tidy, ready for spinning.
Well!! You lot can imagine how this took off. In the middle of a pandemic. People desperate for noesis, information, something challenging, interesting, contact with the rest of the world…this took on a life of its' own. Much of this flax was grown, processed and stored pre WW2. It was of historical significance, to exist function of that is pretty inspiring. Christiane knows what she has and rose to the occasion. She was gifted more than dowry chests, documented more than stories, and sent out more flax to more and more enthusiasts. She also sent out mitt woven linen, patterns, she wrote articles, held workshops, taught well-nigh the history of flax product in Europe, specifically Austria, helped flax lovers from all over the world to connect with each other. The project became massive. She now has assist to manage the assistants of this mammoth undertaking.
Thanks to Christiane I at present accept suppliers of flax in Egypt and Canada and my treasures from Berta's flax plus a customs world wide I can go to if I run into bug and need answers.

Simply the question I'm sure many of you accept is tin flax be of whatsoever use to felters? Yes, I think and then. For binding felt books, for embellishments, for stitching, linen bankroll on a felted image, dry felting onto a linen fabric (not sure, simply the fabric is durable), there must be elements of cross compatibility.
The flavor for demonstrations is coming up and information technology looks like this year we tin can actually go out into the customs over again. I am looking frontward to taking along a fully dressed distaff with some gorgeous blond flax, blowing in the cakewalk, a niggling h2o basin for dipping near at mitt and inspire awe in the local population, that humans tin make thread out of grass. Okay, not awe, just possibly some curiosity, I'll have curiosity.
Following what seemed like a never-ending period in creative limbo, the 2nd quarter claiming has gotten me thinking again. The photos were all amazing but i in detail fix me thinking:

It's funny, loading the photo as reference now, it is not like I remember it in my mind's centre. I idea the pole was further over to the left side of the photo. (Like almost people, I would make a very unreliable eye witness). Having said that, information technology was the inspiration for what comes side by side.
It is said that a picture paints a thousand words and I idea I would add together to my interpretation of the claiming by posting in photos and minimising my discussion count.
I thought I might mail upwards a minor projection that could be completed past either new or experienced felt makers – one that could human action equally a 'blank sheet' for further development if the maker wanted to do this. Or the project could be completed only following the photos. It actually will be in the easily of the creative. If you decide to give it a go, why not mail your results to the site. Y'all tin can do this through the following link, we would love to see them: https://feltingandfiberstudio.com/community-photo-submissions/
Here is what you lot will demand for the project:
- Your bones felting equipment (bubble wrap, soapy h2o, towel, puddle noodle, white vinegar (optional))
- Pattern: 23cm square slice of cardboard. this will act as your guide when you are laying our the fibre.
- A little low-cal plastic (like decorator's plastic)
- Smallish circular shape (for example a cookie cutter 5cm diameter approximately)
- Tops/Roving in your choice of colours.
- Bits of fibre, silks viscose etc for embellishing your flick (optional)
- Fe/Ironing board
- Most of all your creativity.
So, here nosotros go. Just follow the photos and happy felting!


Hither are another flower pictures that I made. I have mounted them on canvas which I covered with thermoformable felt (left over from my chapeau projection). The hat projection was covered in one of my before posts (link: https://feltingandfiberstudio.com/2021/08/xix/its-practiced-to-bend-rules-at present-and-again-part-1/ )


Sorry for today'due south filibuster! I have been decorated this week working on the guild Library report. It's a lot of data to sift through fifty-fifty with a 2nd year of reduced book borrowing due to covid. I do a report in December for the city grants and then one for the AGM in May. It's not the same data since the beginning covers the Year (2021) and the second covers the library term From the AGM in 2021 to AGM 2022. I have a fabulous library team working with me merely I write up the study and so send information technology to Ann to spell bank check and make a synopsis since I tend to exist very thorough. It ordinarily takes a week to get the data into charts and then analyzed a bit so written up into the report. The main data is dropped in the appendix (21 pages) and the short tables go into the report (5 pages). I am but missing one scrap of data to finish information technology but here is the extremely brusque version (not I am not going to show you lot 21 pages of charts!!)
- Library squad: 6 regular members and 3 administration this yr, for a full of 9.
- Acquisitions: 69 new items From Donations, Bequests, and purchases
- Circulation: Total items; 249 (ane item out for repair)
- Format of items in circulation: BOOKS 208, Mag 21, DVD eighteen
- Accessibility: 238.5 hours in the library, plus the hours from March I still accept to add.
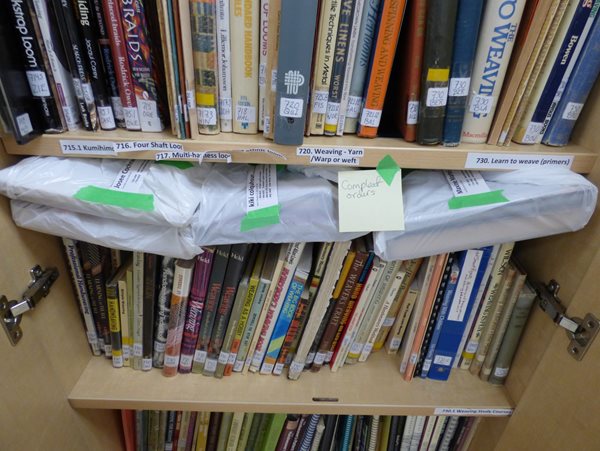
 1 The Felting Section of the Guild Library
 2 Part of the Order Library Cabinets
I besides got a notation off to the newsletter well-nigh the next Library day. Nosotros have been having members e-mail their book requests to the library and nosotros pull, sign out and bag the books. The members come to the library, knock on the window, hold up their proper name signs and we grab their purse of books and meet them at the side door to requite them their books. Information technology has been working quite well over the last 2 years.
 3 books pulled fix to bag
 4 books prepare to go out to members.
2 months agone, we got word that we could take more than people in the studio space, where we have the library. We would need to take simply 2 people browsing the books at a fourth dimension, proof of vaccination and article of clothing a mask at all times. Final month nosotros were allowed 4 people at a fourth dimension looking at books and they could self-administer the health questions, but still had to wear their masks. This month information technology looks similar we may be able to have the regular capacity and no symptoms of sick health for ourselves or assonated people but still keep the mask. We hope that the books tin can finally visit with the guild members in a more personal way.
 5 Ann Ready for in-person book sign-out, for the offset time in 2 years!
So if nosotros can have library happening in a more than normal way Demos of spinning weaving and felting cannot exist far behind. I have been doing demos for the guild since the 1990s, showtime weaving and then adding spinning, and finally adding felting to the options for demos. I'm not sure what my first demo was but it may accept been weaving at a sheep to shawl demonstration at the experimental farm. My outset time spinning at a demo was at a tractor pull competition with another spinner Clara (she was very adept). In the morning time, she spun and answered questions. By the afternoon, I was spinning and talking at the same time also!
At first, I carried a folding Leclerc table loom either a 2 or 4 harness. They didn't feel heavy at the time only after quite a few years they seem to take gained weight. I was sometimes likewise bringing a wheel or 2 depending on the demo. For the Carp Fair demo I could make full a pocket-size station wagon with equipment and display stuff (they gave u.s. a 20x xx tent to set up a four-table display, it was a challenge that we filled each year.)

 6-7 weaving at the same demo (it's a super long warp!)
 viii We let anyone who wants to have a try. Information technology means we get many interesting variations on the pattern we thought we were doing!
Over the years, I accept learned a lot of demo tricks. one of the best is if you lot think you will exist on damp grass or it might rain (we have had sudden small rivers appear in tents we were demoing in when information technology rained), bring a plastic nether bed box or depression sided storage bin that your wheel will fit into too equally your feet. Spinning in a plastic box volition go along your feet and wheel dry. If it's just morning dew to worry about bring a rubber-backed kitchen matt that is big plenty to fit under your wheel. They coil up and take up niggling space to bring with you. I also have a folding wagon that can transport wheels, looms, wool, a folding table… from the car to the demo spot if I cant become the car close to unload.
 9 One of my Friends demonstrated the weight capacity of a folding wagon
 x a Plowing match demo with a tarp to keep the dew off the wheel
 xi Manotick demo in a tent in the pelting.
 12 in a tent, raining at the Richmond Fail (trundle box is tucked under the tabular array.)
Another sneaky affair I exercise at demos, now that I am besides felting, is I have a couple of pieces that I relieve to work on only at demos, that are works in progress. I have constitute that when I am just starting out with a picture or sculpture there is a lot of mild marvel. However, if I have something underway to the bespeak yous tin make a skillful guess at what I might be doing, I tend to become more interest and questions. "Is it a dog?" gets kind of boring until someone says very hesitantly "….is that.. a ..polar bear?" "Yep! It is!!"
 13 Polar carry finally looks a bit less similar a dog.
 14 Makers off-white demo
 15 Demo at Wool Growers Co-Op, Carlton place
When you demo y'all don't have to know everything, so don't be agape of questions. It's fine to say "I'1000 still new and don't know that, but nosotros can see if we can find out". If you are demoing in a grouping inquire the others who are demoing, if you are by yourself, refer them to your guilds email to enquire. At that place are also breed specific organizations you tin find many of the contacts at sheep 101 on the internet.
Second, don't worry that you're non a master weaver, spinner or felter. At that place are not a lot of masters out there and they all started somewhere not being masters. If you enjoy what you're demoing, your enthusiasm will be contagious. In addition, if you're just beginning, it shows others they tin can do this as well. Watching someone make fluffy fibre stick together information technology'south like magic! Watching someone make perfect fine lace weight yarn is a chip daunting, If it is a slubby functional yarn, that may actually exist much more outgoing. It'due south amazing how many times someone will inquire, "What happens when it brakes?" then you accidentally brake it and show them how information technology reattaches.
Once I took my Ashford Traditional out to a demo. It is a lovely wheel, the golden retriever of wheels! "Is that fibre? Can I spin it for y'all?" anyway I had the drive band brake and had repaired it but only had blue crochet cotton so I had a blue bulldoze band and was spinning white wool. Y'all tin see where this is going I am sure. After having a man stand staring at the wheel for much longer than almost people stop and just stare, he finally asked.
"How does the wool go from white to blueish, so back to white?"
"Good question!" so I stopped the wheel and showed him the path for the yarn through the orifice and on to the bobbin and the path of the drive band and how the treadle and footman turned the wheel.
I hope we will be able to demo once more presently. It is a lot of fun and yous may detect others who didn't know anyone did weaving, spinning or felting and they have e'er wanted to learn to exercise that likewise!
 16 Basket dragon with hand died wings, Bother Fair Demo
I take lots of photos of the demo brandish and other people demoing. I am unremarkably the one with the camera so these are well-nigh of the pictures I have of me really demoing.
 17 1812 was not my best twelvemonth, the diminutive Slap-up Wheel and the Robiedue wheel went to this demo with me. Demo at Chrysler for 1812 battle asked to demo in costume.
 18 Demo at Bother Fair
Have fun and keep felting (hopefully soon in public!)
 19 1 of my long-term-in-progress-demo pieces.
As about everything I have for felting is packed in boxes at the moment, I idea I would share some of the pictures I've taken effectually the farm for inspiration for the second quarter challenge. Ordinarily, I take landscape-type pictures, most often with sheep in them or pictures of flowers, mucus or moss. I tried to exist less organic this time.
These are parts of a rusty trailer. the get-go three are the fenders and the next ones are the decking. I particularly like the rusty $.25.


These are some chairs we have the plastic ones had blown over in the wind and the undersides were quite interesting and dirty. How practise they go so muddy underneath?


This is a stack of metal chairs waiting for warm atmospheric condition.

Here are a few more metal bits I constitute effectually on a walk with the dog.


The bottom of my daughter's canoe was skilful for a couple of pictures, an old label and scratched-up paint.


Many years agone we had a fenced yard. There is ane minor flake left that is slowly going back to nature.


A argue mail service in the field


And I couldn't resist some moss and a cool rotting log.


Hopefully, I have inspired you to take some unlike pictures and not made yous nod off. You can utilize one of these for inspiration if one catches your middle. We would love to encounter it. y'all can share your inspiration and your finished work in our gallery by using this form. https://feltingandfiberstudio.com/community-photograph-submissions/

This is a guest post by Cindy, our beginning reader to submit a photo for the 2nd Quarter Claiming. If y'all would like to submit a photograph, you tin can do then here.
Hello everyone, my name is Cindy and I honey playing with fibers – all the wonderful colors and textures. I sabbatum down in the evening to relax and opened upwards Felting and Fiber Studio to savour the new posts. It is always like picking up a good book to read.
I was delighted that the 2nd quarter challenge was about noticing the picayune things – the details in everyday life. The project I just finished surprisingly enough was exactly that – a close upwardly piece to resemble the ribs on a saguaro cactus. I decided to mail the moving picture on the site for the claiming. Ruth reached out to ask more about information technology and would I share my process with the group – I happily agreed to exercise then – hope you enjoy.
I had been admiring the manner the light and the shadows play on the saguaro cacti in my yard and surroundings. I started examining them – really paying close attention. I decided to make a few saguaro sculptures working on form and trying to get some texture as well. I had a shibori slice that I made on my desk-bound and my thoughts meandered (as they often exercise -LOL) – wondering if this method would work to make the texture and ribs for a saguaro. I did not know if I would be able to go along the lines fairly directly to become the expect I wanted or if they would scrunch up and be more of a zig zag like my other piece, which I honey but non for this project. I thought it was worth a endeavour. Here are a couple of my inspiration photos of saguaros in my yard that I was watching the play of low-cal and shadows.
The inspiration photo on the right is a close upwards of the ribs of a cactus that I took a few years ago when we had snow in our area – which is a rare occurrence and that I enjoy immensely.
I gear up out to lay out cobweb to wet felt – knowing that I would exist pleating the piece for the ribs – I laid out the piece approx. 22" long x 9" high. I wet felt my pieces between a lightweight tightly woven fabric – assuming a polyester or such as it does non felt. I call it "slip" material considering that is what I originally bought it for. You can meet information technology under the fibers in the photograph below.
The beginning layer is blackness core fiber. I knew I was going to have a few layers of colors, and then I laid out each colour pretty thin as I did not desire the finished piece besides thick. The movie shows the initial black core layer followed past the starting time of the 2nd layer – copper colored fiber.

Hither you can see the second layer of copper finished with all the fiber going in the aforementioned management.

Next, I added some wisps of a tan core fiber as a 3rd layer. You lot can see that I did not embrace it entirely – only wanted some lighter color for emphasis.

Information technology was time to add together a 4th layer of green, which was maori wool fiber.


I wanted more hues of green to add together calorie-free and depth – so the next footstep was to add fine wisps of lima edible bean colored Corriedale wool fiber. I also added fine wisps of other greens – lime, Christmas, evergreen and olive – again to get light and depth in the piece. I decided to cut up some wool yarns in light, medium and dark browns to brand the "spots" that I noticed on the close-upwardly photograph. Notation: I would say that all of these composite in and I did not get the spots as intended, just they did add to the overall look of the piece. At this fourth dimension, you can add whatsoever other embellishments that you lot might like. I enjoy color, so I added some purple and dark blue strands.

Adjacent, I folded over my piece of "slip" material to cover the fiber and started the wet felting process – wetting with soap and water and rubbing and rolling the piece thirty-l times each side and direction to obtain to a prefelt material. My all-time description of prefelt is a soft material in which all the fibers and embellishments (if any) are interlocked together and are not moving loosely – it is basically a piece of soft fabric. When it reached that stage, I rung the soap and water out of the piece and gently rolled it in a towel to get out nigh of the moisture. I was impatient to start the adjacent step and did not want to wait for it to dry.

It looks bumpy, just that is considering the photo was taken just later I squeezed out the soapy water. Note: the blue shelf liner material, in the side by side photos, was under the bamboo mat for grip. Starting on the left side, I went in approx. 3⁄4" and made an upward fold (ane/2" – 3⁄4") in the prefelt, I manus sewed a medium long basting running run up at the base of operations of this fold with black heavy-duty thread to make a "rib". Annotation: at the showtime of the run up, I knotted the thread at the back of the piece. When I finished top of each row, I left the thread long (approx. 3") and loose. My theory was if it was loose, it would not pull, since I wanted the rows fairly straight. I sewed ribs all forth the piece leaving space between each rib. I added a few "Y" ribs with my stitching. If you expect closely at a saguaro, you see that where information technology changes shape from wide to narrow, the ribs form a Y. You may be able to make this out at the top of the close-upwards photograph. In the spaces between the ribs, I decided to sew a running sew together. I left the thread approx. 3" long and loose on both edges. This was an attempt to become more dots that I was seeing in the close-up photograph.


In the photo below all the paw sewing completed and the slice full of ribs, information technology was ready for the felting/fulling process. I sandwiched the piece between the white poly/sideslip cloth. Added soapy h2o to the slice and began the fulling process by rolling information technology in a bamboo mat. I was ever mindful of the ribs. I would open periodically to compression the ribs to brand certain that they were not felting together, and to keep them upright.

In one case the piece was firmer and holding its shape, I rolled it up on itself with the ribs inside then with them outside, alternate between both directions, and continued to roll it. I connected until I was happy with the size, texture and firmness of the piece. I then took a modest pair of sharp pointed scissors and began to snip small lines and indents on the elevation of each of the ribs so that the tan, copper and black colors would be exposed to mimic the spines on the ribs of the saguaro. I was mindful of how deep I cut
with the scissors to betrayal the colour I was subsequently.
The stitched lines betwixt the ribs had all but disappeared in the felting procedure so I advisedly sliced off a very sparse layer of felt at these areas to expose the stitches and my fun dots appeared! I decided to expose more of the colors underneath, so I carefully snipped away little areas here and there. I am happy to say the ribs stayed straight without the zig zag wait I was afraid I might get when I fabricated the cuts to betrayal the colors underneath. I believe that is because the thread remained loose, non tight, equally it felted. I similar all the colors and how they await together and the many hues of greens assist with the light and shadow on the ribs. In fact, the correct side looks brighter to me as if the lord's day is shining on it. I am very pleased with how this piece turned out.
Beneath is a photo of the finished piece on a white background with the lighting from above, so that you can see the colors and the fun black threads. Notice I cut all the manner through the felt to expose the background color in just a few of areas.

I may trim a few of the long black threads. I plan to keep the threads exposed as they represent a continuation of sorts of the ribs on the groundwork.
The final photo shows how it would look framed. I placed information technology on a copper felt background with a rustic forest frame with the strings tucked behind. Every bit you can see, the light is coming from the right and happily playing calorie-free and shadows across the ribs.

Hope you enjoyed and promise it inspires you to try felting if yous haven't already. Thank y'all, Ruth, for letting me share my fun project. 🙂 cindy
Source: https://feltingandfiberstudio.com/
Post a Comment for "This Example of Fiber Art Is a Woven Wall Hanging Cloth Art 101"